Introduction
The Ponseti Method is a conservative and manipulative method that is utilised worldwide to correct clubfoot or Congenital Talpes Equino Varus (CTEV)[1].
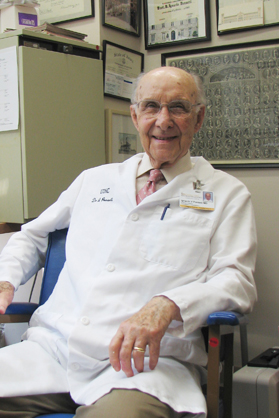
It was developed by [2]. This method was developed in response to the complications and poor outcomes which came with surgical management of clubfoot[3].Dr. Ponseti was convinced there was a more efficient and effective way of treating clubfoot this resulted in him studying extensively functional and patho-anatomy of the normal foot and the one which presented with clubfoot[4].
The Ponseti Method has become the gold standard of treatment compared to the other interventions because of its better outcomes [1].The use of the Ponseti has spread worldwide with evidence shown in 113 out 193 united nations member countries.[5] Numerous research studies in countries across the globe in the last 20 years have shown that more than 90% of cases of newborn children with idiopathic clubfoot can gain initial correction of deformity with the Ponseti Technique.
Ponseti Method for clubfoot has, in many countries, completely replaced the previous methods of treating clubfoot, which were a mix of surgical and conservative techniques, such as strapping. The Ponseti method consists of 2 equally important phases: the corrective phase and the maintenance[6] phase and consist of serial manipulation, casting and tenotomy of the Achilles Tendon.[7] This is followed by the use of foot abduction brace to prevent the occurrence of relapse. All these procedures are divided into two phases; [6]
- Casting Phase which consist of Manipulation, Casting and Tenotomy [6]
- Maintenance Phase which is the use of Foot Abduction Brace to prevent relapse or recurrence [6][8]
The video below shows a short documentary on clubfoot treatment from the National Geographic [9]
Goals of Ponseti Method
The goal is to reduce if not eliminate all elements of the clubfoot deformity, hence leaving a functional / pain- free, normal-looking, plantigrade, mobile foot
- Functional, Pain-free Feet
- Wear Normal Shoes
- Avoid Permanent Disability
Description of Procedure
The majority of clubfeet can be corrected in infancy in about six to eight weeks with the proper gentle manipulations and plaster casts. The treatment is based on a sound understanding of the functional anatomy of the foot and of the biological response of muscles, ligaments and bone to corrective position changes gradually obtained by manipulation and casting. [6]
The components of the clubfoot deformity must be corrected in the sequence C-A-V-E. We start with Cavus, Adductus, Varus, then finally Equinus. Cavus, which arises from pronation of the forefoot in relation to the hindfoot, is corrected by supinating the forefoot in proper alignment with the hindfoot. Adductus and Varus are corrected by gradually abducting the midfoot, with movement occurring in the plane of the sole of the foot. The entire foot can be gently and gradually abducted under the talus, which is secured against rotation in the ankle joint by applying counter-pressure with the thumb against the head of the talus. Heel varus will automatically be corrected when the entire foot is fully abducted. Finally, Equinus is corrected by dorsiflexing the foot. This is generally facilitated by a simple percutaneous tenotomy of the tendo Achilles. Well-moulded plaster casts are applied after manipulations are complete. [6]
Less than 5% of infants born with clubfeet may have very severe, short, plump feet with stiff ligaments, unyielding to stretching with a deep transverse skin fold across the sole of the foot and another crease above the heel, known as ‘Atypical’ or ‘Complex’ Clubfoot. These babies require modified treatment. The results are better if bone and joint surgery can be avoided altogether. Surgery in the clubfoot is invariably followed by scarring, stiffness and muscle weakness which becomes more severe and disabling after adolescence. [6]
The treating clinician must have a sensitive and kind approach to babies. After a general examination to rule out non-idiopathic clubfeet, parents should be reassured that their baby’s deformity can be corrected over a 2 month period and that the baby will have a normal-looking and functional foot throughout life. X-rays are not necessary. Plaster casts are applied each week after the manipulation to hold the position reached that week. They are then removed the next week just before the next manipulation. [6]
Foot examination and corrective manipulations are best done with the baby resting on the mother’s lap. When applying the plaster cast, the baby is placed at one end of the table to provide room for the mother and assistant on either side. A bottle of milk or sucking on the breast relaxes the baby.
Corrective Phase
During the corrective phase the position of the foot is gradually corrected using a series of manipulations and plaster of Paris casts, then finally a small outpatient procedure is performed to cut the Achilles Tendon (Tenotomy). The Corrective Phase usually takes 4–8 weeks and the baby is seen weekly for the treatment.
Where possible the treatment should begin in the first weeks or two of life in order to take advantage of the favorable elasticity of the tissues forming the ligaments joint capsules and tendons. With our treatment these structures are stretched with weekly, gentle manipulations. A plaster cast is applied after each weekly session to retain the degree of correction obtained and to soften the ligaments. Thereby, the displaced bones are gradually brought into the correct alignment. [6]
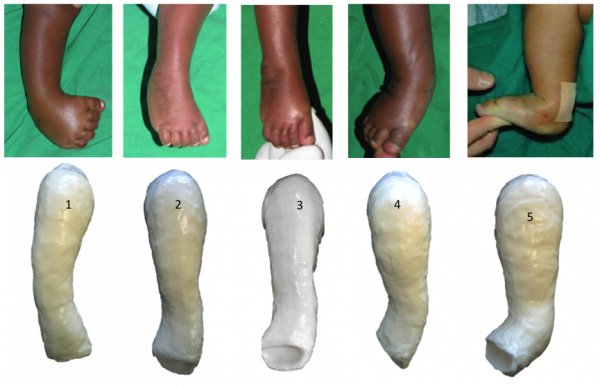
Five to seven plaster casts extending from the toes to the upper thigh with the knees at right angle should be sufficient to correct the clubfoot deformity. Even the very stiff feet require no more than 8 or 9 plaster casts to obtain maximum correction. Before applying the last plaster cast which is to be worn for three weeks, the Achilles Tendon is often cut in an Out Patient Procedure to complete the correction of the foot. By the time the cast is removed the tendon has regenerated to a proper length. Recently studies suggest that the treatment can be shortened by changing the plaster casts every five days. [6]
Step 1. Find the Lateral Head of Talus
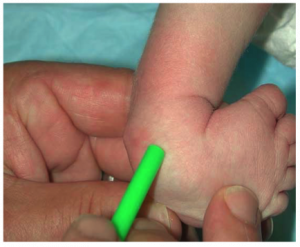
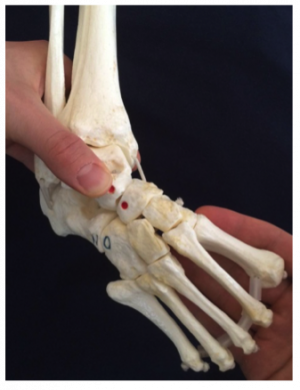
The lateral head of talus is going to be the central point or fulcrum around which the foot moves as it is corrected, and the place where the manipulator’s thumb needs to apply gentle pressure. It is therefore important that it is identified before any correction can occur.
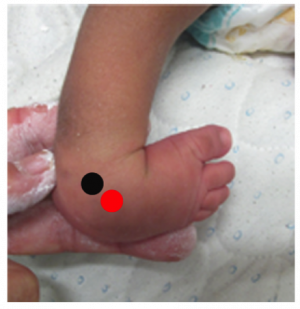
The Lateral head of Talus in a baby is usually about 1cm anterior to the lateral malleolus.[6]
In some children the anterior process of the calcaneum (red) can also be felt, just below the lateral head of talus (black). [6]
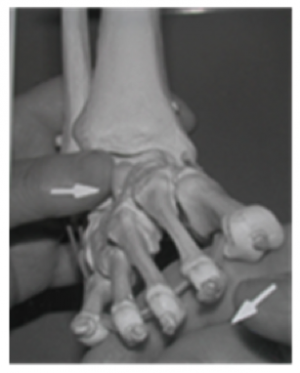
There are several ways to hold the foot while doing Ponseti manipulations. If it is a right foot as in the picture below, we recommend using the left thumb on the lateral head of talus with the left index and middle fingers holding the medial malleolus but not touching the heel. The right hand’s fingers can then manipulate the forefoot as needed. For a left foot we recommend using the right thumb on the head of talus and the fingers of the right hand going round the ankle, with the left hand free to manipulate the forefoot.
Remember: The calcaneum must not be touched during manipulation as its position corrects naturally as the forefoot is brought into abduction. [6]
This picture shows a right foot. The manipulator’s left thumb is on the talar head and the right hand is free to manipulate the forefoot. [6]
Remember: Never Touch the Heel
Step 3. Correction of Cavus
The cavus is corrected by supinating the forefoot, which elevates the first ray, thereby placing the forefoot in proper alignment with the hindfoot. The sole of the foot should be examined whilst doing this, with the aim being to position the forefoot to create a normal looking arch of the foot.Since the cavus usually is not a fixed deformity at birth, correction often occurs with the first cast. Correction of severe cavus in a stiff foot will need 2 or 3 cast changes with the forefoot in supination.
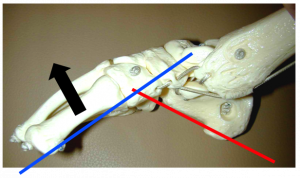
It should be noted that often a Clubfoot can look worse after correction of the cavus. Parents should be reassured that this is temporary.[6] This picture shows the cavus deformity on a model. It can be seen that the arch is high and that to correct it the first metatarsal needs to be elevated (in the direction of the black arrow).
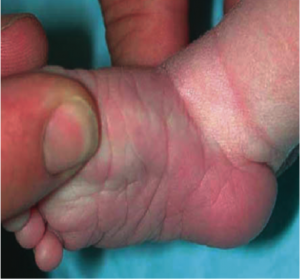
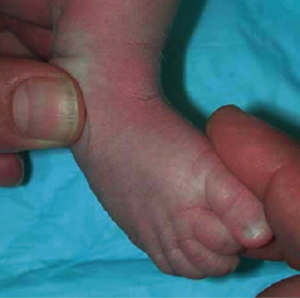
These two pictures show the first metatarsal (first ray) being elevated to correct the cavus. (Elevating the first ray is supinating the forefoot) [6]
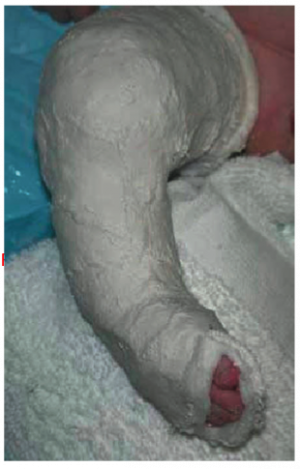
First cast after correction of cavus. The first metatarsal is being held up by the cast to correct cavus. Remember that parents can worry at this stage as the foot can look a little worse. [6]
Step 4. Correction of Adductus
Once the cavus is corrected then manipulations to correct the adduction of the forefoot can be started.
The plantarflexed foot is slowly abducted while counter-pressure is used on the head of the talus. Ligaments on the medial side of the foot are stretched. The distal end of the calcaneum disengages from its position under the head of the talus and allows the calcaneum to abduct.
Plastic model showing method of correction of adductus. While the midfoot is kept in supination and plantarflexion, it is gently abducted under the talus. The thumb applies pressure to the lateral side of the head of the talus, NOT the calcaneum.
Use gentle continuous pressure for a few seconds. Repeat once or twice more when the baby is relaxed, and aim for a total of 60 seconds of stretching. Do not struggle with the baby. The aim is to achieve 50-70 degrees of abduction. This usually occurs in about 4 weeks of manipulation. As the abduction increases the manipulator can feel that the lateral head of talus is starting to be covered by the navicular as it moves laterally. Once 50–70 degrees of abduction is achieved the talus is usually fully covered.
Note on Dorsiflexion: Care should be taken not to actively dorsiflex the foot while abducting. We will concentrate on dorsiflexion once the foot is fully abducted and the calcaneum has disengaged from under the talus. However, having said this, when the forefoot is abducted a little dorsiflexion does naturally occur because of the shape of the joints of the foot. [6]
Step 5. Automatic Correction of Varus
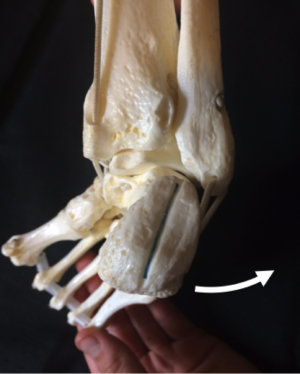
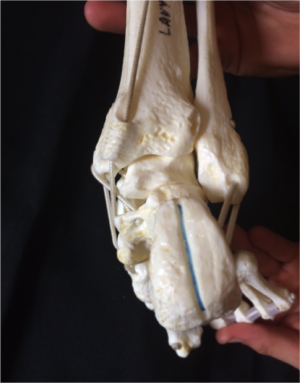
The varus of the heel and the whole foot does not need to be actively corrected because it corrects automatically as the forefoot adduction is corrected. While the forefoot is abducted the navicular, the cuboid, and the entire foot are displaced laterally in relation to the head of the talus. The anterior portion of the calcaneum follows, and automatically the heel varus deformity is corrected. This is better seen from behind as in the pictures below.
If you look at a model of the clubfoot from behind you will see that as the forefoot is abducted so the heel varus corrects automatically. The heel on the left is in varus (tilted towards the midline) but as the forefoot is abducted it tilts in the direction of the white arrow until it reaches a neutral or slightly valgus (tilted away from the midline) position. The heel does not need to be touched.
This automatic correction of the varus heel is due to the shape of the joint between the talus and the calcaneum and is known as “Kinematic coupling”. The improvements obtained by each manipulation are maintained by immobilizing the foot in a well-moulded plaster cast for 7 days, before removing it for the next cast.
After 4 or 5 casts, the entire foot should be abducted between 50 and 70 degrees under the talus and be no longer supinated. The navicular moves laterally away from the medial malleolus. The lateral aspect of the head of the talus cannot now be palpated since it is covered by the navicular. The heel is in some valgus. The calcaneum is now in the right position relative to the talus and the foot is ready for correction of equinus. [6]
Step 6. Correction of Equinus
This is the last stage in the correction of the clubfoot deformity. A little correction of equinus occurs naturally as the foot is abducted but no attempt should be made to actively dorsiflex until:
- The talar head is covered, usually the midfoot contracture score is 0
- The foot is abducted to 50 – 70 degrees
- The heel is in valgus or at least neutral
These 3 points should have been achieved at this stage and gentle dorsiflexion can be tried. In the majority of cases it will be tight, and the child will need a tenotomy of the Achilles tendon which will be covered in more detail on the Achilles Tenotomy page. In a very few cases dorsiflexion can be achieved, and if it is possible to greater than 15° then the child can be put into a final cast in 60° abduction and maximal dorsiflexion. [6]
Remember: Cover the Talus before Tenotomy
Step 7. Casting
The application of casts is a crucial part of the correction of clubfoot deformity. The cast is needed to maintain the correction that has been achieved by manipulation. If the cast is badly put on it can slip and lose correction, it can also cause rubbing and skin breakdown. Like all skills it is best learned by practical demonstration but this chapter outlines the key points. [6] Read more details about Casting Process for Clubfoot on the following Physiopedia Page.
Step 8. Tenotomy
The tenotomy corrects the rigid equinus. It is a complete cut through of the Achilles Tendon, not a Tendon Lengthening. It creates a very small incision – it is known as a percutaneous (“through the skin”) tenotomy.[6] Read more details about Achilles Tenotomy on the following Physiopedia Page.
Maintenance Phase
Following Correction Phase the clubfoot deformity tends to relapse without adequate management. To prevent relapses, when the last plaster cast is removed a brace must be worn full-time for two to three months and thereafter at night for 3-4 years. The brace, known as a Foot Abduction Brace, consists of a bar (the length of which is the distance between the baby’s shoulders) with open-toed shoes attached at the ends of the bar in about 70 degrees of External Rotation. The baby may feel uncomfortable at first when trying to alternatively kick the legs. However, the baby soon learns to kick both legs simultaneously and feels comfortable. In children with only one clubfoot, the shoe for the normal foot is fixed on the bar in 40 degrees of external rotation. During the daytime the children wear regular shoes. [6]
When the deformity relapses in spite of proper splinting a simple operation may be needed when the child is over two years of age. The operation, Tibialis Anterior Tendon Transfer, consists in transferring the anterior tibial tendon from its insertion on the medial side of the foot to the third cuneiform.When the deformity relapses in spite of proper splinting a simple operation may be needed when the child is over two years of age. The operation consists in transferring the anterior tibial tendon to the third cuneiform.
Poor results of cast and manipulative treatments of clubfeet in many clinics indicate that the attempts at correction have been inadequate because the techniques used are flawed. Without a thorough understanding of the anatomy and kinematics of the normal foot and of the deviation of the bones in the clubfoot, the deformity is difficult to correct. Poorly conducted manipulations and casting will further compound the clubfoot deformity rather than correct it making treatment difficult or impossible.
Clinicians with limited experience in the treatment of Clubfoot should not attempt to correct the deformity. They may succeed in correcting mild Clubfeet, but the severe cases require experienced hands. Referral to a center with expertise in the non-surgical correction of Clubfoot should be sought before considering surgery.Resources
References
- ↑ 1.01.1 Radler, C., 2013. The Ponseti method for the treatment of congenital club foot: Review of the current literature and treatment recommendations. International Orthopaedics, 37, pp.1747–1753.
- ↑ Zwick, E.B., Kraus, Tanja.,Maizen,C.,Steinwender,G.,Linhart, Wolfgang E. 2009. Comparison of ponseti versus surgical treatment for idiopathic clubfoot: A short-term preliminary report. Clinical Orthopaedics and Related Research, 467, pp.2668–2676.
- ↑ Gerlach, D.J., Gurnett, CA.,Limpaphayom, N.,Alaee, Farhang.,Zhang, Z.,Porter, K.,Smyth, M. D Dobbs, Matthew B 2009. Early results of the Ponseti method for the treatment of clubfoot associated with myelomeningocele. The Journal of bone and joint surgery. American volume, 91, pp.1350–1359
- ↑ Harmer, L. &; Rhatigan, J., 2014. Clubfoot care in low-income and middle-income countries: From clinical innovation to a public Health Program. World Journal of Surgery, 38, pp.839–848
- ↑ Shabtai, L. et al., 2014. Worldwide spread of the Ponseti method for clubfoot. , 5(5), pp.585–590.
- ↑ 6.006.016.026.036.046.056.066.076.086.096.106.116.126.136.146.156.166.176.186.196.206.216.22 Africa Clubfoot Training Project. Chapter 5 Africa Clubfoot Training Basic & Advanced Clubfoot Treatment Provider Courses – Participant Manual. University of Oxford: Africa Clubfoot Training Project, 2017.
- ↑ Gopakumar, T. & Rahul, M., 2014. Ponseti technique in the management of Idiopathic club foot. Kerala Journal of Orthopaedics, 27(1), pp.15–17.
- ↑ Staheli, L., 2003. Clubfoot: Ponseti Management. GlobalHELP Publicatioons, pp.1–32.
- ↑ National Geographic.For Children With Clubfoot, Treatment Can Be Life Changing.Available from: function gtElInit() { var lib = new google.translate.TranslateService(); lib.setCheckVisibility(false); lib.translatePage('en', 'pt', function (progress, done, error) { if (progress == 100 || done || error) { document.getElementById("gt-dt-spinner").style.display = "none"; } }); }
Ola!
Como podemos ajudar?

